|
The Basic C420 Rigging Guide
by Jim Young
(UPDATED early 2018 - this guide was originally
written for the Performance C420, built by Perfomance Catamarans (NACRA),
in 2004. The mold for that boat was purchased by the then-new Zim Sailing
in late 2009. Zim has made a few rigging updates and hardware changes
over the years since, but all of the same basics apply. You should be
able to use this guide to help rig a C420 of any vintage, regardless
of builder.)
From out of the box to ready to go sailing, this is how to set up your
new C420.
Lots of pictures here, study them carefully.
Start with the hull. Make sure all fittings are securely attached.
Have a roll of tape handy, and use it to tape over any split rings or
cotter pins that do not normally get adjusted. Then move on to getting
the lines inside the hull organized, it will make life much easier to
do it first rather than wait until after the mast is up.
 The
top of the Board Box (also called the centerboard trunk). The
top of the Board Box (also called the centerboard trunk).
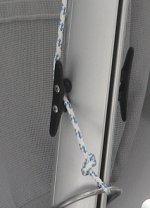
Take a close look at the top of the board box and all the cleats.
The aft/starboard cleat is for the board uphaul, and the forward/port
cleat is for the board downhaul. Make sure both are free and working.
Notice in the photo how the board uphaul line is tied off for traveling.
Hiking Straps
 Now
take care of the hiking straps. The front ends actually go over
the top of the Now
take care of the hiking straps. The front ends actually go over
the top of the thwart (yes, that is what that glass thing going from the board box
to the inside of the cockpit is called). The ends slide over a bar that
is bolted into place from underneath the front edge of the thwart. From
there, tie the back ends of the straps to the eye at the aft end of
the cockpit. Tie them tight, you don't want sag in the straps, and then
tape the knots. Finally, tie the straps to the bar across the back of
the board box (top board box photo).
thwart (yes, that is what that glass thing going from the board box
to the inside of the cockpit is called). The ends slide over a bar that
is bolted into place from underneath the front edge of the thwart. From
there, tie the back ends of the straps to the eye at the aft end of
the cockpit. Tie them tight, you don't want sag in the straps, and then
tape the knots. Finally, tie the straps to the bar across the back of
the board box (top board box photo).
New in 2006, a new hiking strap that lets you fix the length between
the skipper and crew position, really great for a shorter crew to be
sure the strap is longer. Use the eyes to tie to the crossbar with utility
cord, not shock cord.
Next, attach the mainsheet ratchet block to the eye strap on the back
end of the board box - not to the eye on the bar - on its stand-up spring.
Shock Cords
 Now
to the front end. There are two shock cords to organize, one runs across
the back end of the spinnaker bag through a pair of holes on either
end of the bag area - Now
to the front end. There are two shock cords to organize, one runs across
the back end of the spinnaker bag through a pair of holes on either
end of the bag area - 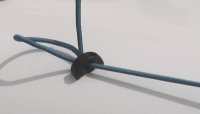 pull
cord ends through the holes and use figure-8 knots. Next run the trapeze
shock cord, it runs from the small eyes on either side near the side
stays, up thru holes in the mast partner and around a block hidden up
underneath the bow, to the eye on the other side. Use a bowline knot
to leave about a 2-inch loop in the cord as it comes out of the eyes. pull
cord ends through the holes and use figure-8 knots. Next run the trapeze
shock cord, it runs from the small eyes on either side near the side
stays, up thru holes in the mast partner and around a block hidden up
underneath the bow, to the eye on the other side. Use a bowline knot
to leave about a 2-inch loop in the cord as it comes out of the eyes.
Mast
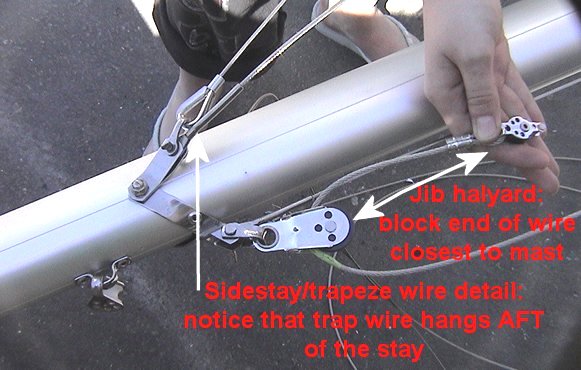 Next
we need to get the mast organized. We want to get all the lines run
and everything taped before the mast goes up. Lots of little details
here; notice how the trapeze lines hang from the shackle loops and the
shackle pin is used for the side stays. Likewise, the shackle pin for
the jib halyard does double-duty, with the forestay. Next
we need to get the mast organized. We want to get all the lines run
and everything taped before the mast goes up. Lots of little details
here; notice how the trapeze lines hang from the shackle loops and the
shackle pin is used for the side stays. Likewise, the shackle pin for
the jib halyard does double-duty, with the forestay.
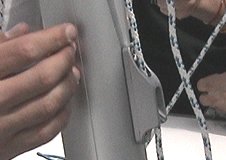
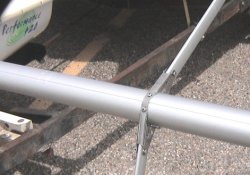 Next
item is to attach the spreaders, this is done with the clevis pins that
are in the fitting on the mast. Just line up the holes. Now look at
the ends of the spreaders and the small hook-eye and screws. The side
stays go through here. This is a good place to start using tape, cover
the ends of the bars well so that there is nothing to snag a sail or
line. Next
item is to attach the spreaders, this is done with the clevis pins that
are in the fitting on the mast. Just line up the holes. Now look at
the ends of the spreaders and the small hook-eye and screws. The side
stays go through here. This is a good place to start using tape, cover
the ends of the bars well so that there is nothing to snag a sail or
line.
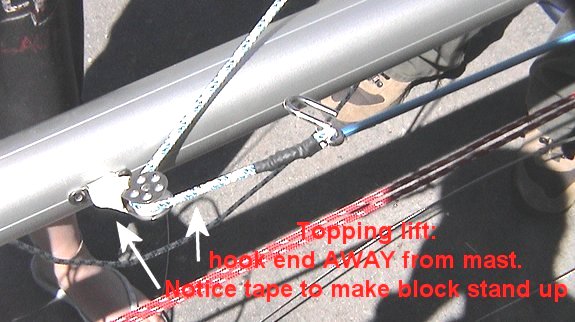
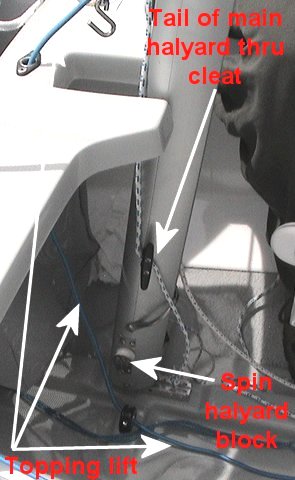
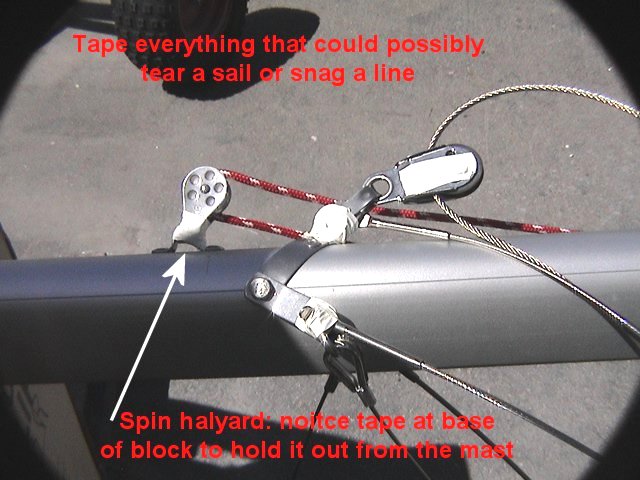 Now
attach and run all the lines; the main halyard up and through the top
fitting on the mast, the spinnaker halyard through its block just above
the hounds (where the stays all attach), the jib halyard line gets tied
to the becket on the block on the end of the jib halyard wire, and the
topping lift line gets run through its block closer to the middle of
the mast. Make sure the metal hook that is attached to both the line
and the shock cord is on the part of the line coming out of the FRONT
of the block (photo below). Now get out the tape again and start covering
everything that might snag a sail, and notice especially how we use
tape to make the spin halyard and topping lift blocks stand away from
the mast - if you don't do this, the block will fall against the mast
and pinch the line so it will not run freely. Now
attach and run all the lines; the main halyard up and through the top
fitting on the mast, the spinnaker halyard through its block just above
the hounds (where the stays all attach), the jib halyard line gets tied
to the becket on the block on the end of the jib halyard wire, and the
topping lift line gets run through its block closer to the middle of
the mast. Make sure the metal hook that is attached to both the line
and the shock cord is on the part of the line coming out of the FRONT
of the block (photo below). Now get out the tape again and start covering
everything that might snag a sail, and notice especially how we use
tape to make the spin halyard and topping lift blocks stand away from
the mast - if you don't do this, the block will fall against the mast
and pinch the line so it will not run freely.
 The
mast is almost ready.... pull all the lines down and tie the ends together
or tie them at the spinnaker pole ring so you don't lose them as the
mast goes up. The
mast is almost ready.... pull all the lines down and tie the ends together
or tie them at the spinnaker pole ring so you don't lose them as the
mast goes up.
  Before
you put the mast up, attach the side stay adjusters to the stay plates
on each side of the boat. You don't need to attach the side stays until
after the mast is up. Now put the mast base bolt in to the second hole
from the front in the mast base fitting in the hull. This is a good
starting point, and may change after experience, and skills, show the
sailors how to balance the boat for optimum speed. You may want to check
this by measuring inside the boat from the transom to the back edge
of the mast after it is up; most C420 tuning guides recommend this distance
be 9' 4 1/2". Before
you put the mast up, attach the side stay adjusters to the stay plates
on each side of the boat. You don't need to attach the side stays until
after the mast is up. Now put the mast base bolt in to the second hole
from the front in the mast base fitting in the hull. This is a good
starting point, and may change after experience, and skills, show the
sailors how to balance the boat for optimum speed. You may want to check
this by measuring inside the boat from the transom to the back edge
of the mast after it is up; most C420 tuning guides recommend this distance
be 9' 4 1/2".
Set the mast in the boat, align the mast base groove with the bolt,
and raise the mast. 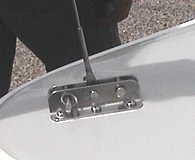 Attach
the forestay first, to the middle hole on the bow plate, the attach
the sidestays so they are very slack, just enough to hold the mast up. Attach
the forestay first, to the middle hole on the bow plate, the attach
the sidestays so they are very slack, just enough to hold the mast up.
 Once
the mast is up, its time to organize the nest of lines. Start with all
the ropes; run the main halyard tail through the clam cleat on
the front of the mast that is about 1 1/2 ft above the deck, then run
the tail through the center of the cleat on the PORT side of the mast
below the deck. Tie a figure-8 in this end so its does not run back
out of the cleat. Once
the mast is up, its time to organize the nest of lines. Start with all
the ropes; run the main halyard tail through the clam cleat on
the front of the mast that is about 1 1/2 ft above the deck, then run
the tail through the center of the cleat on the PORT side of the mast
below the deck. Tie a figure-8 in this end so its does not run back
out of the cleat.
 There
is a reason for using the cleat like this, so you can raise the mainsail
by pulling up on the halyard where it comes through the cleat standing
in the cockpit - this makes it MUCH easier to raise the mainsail when
the boat is in the water. Tie off the other end (the part of the aft
side of the mast) of the main halyard any place convenient (like the
spinnaker pole ring) so it doesn't run away. This is the end that gets
tied to the mainsail to raise it when its time to go sailing. There
is a reason for using the cleat like this, so you can raise the mainsail
by pulling up on the halyard where it comes through the cleat standing
in the cockpit - this makes it MUCH easier to raise the mainsail when
the boat is in the water. Tie off the other end (the part of the aft
side of the mast) of the main halyard any place convenient (like the
spinnaker pole ring) so it doesn't run away. This is the end that gets
tied to the mainsail to raise it when its time to go sailing.
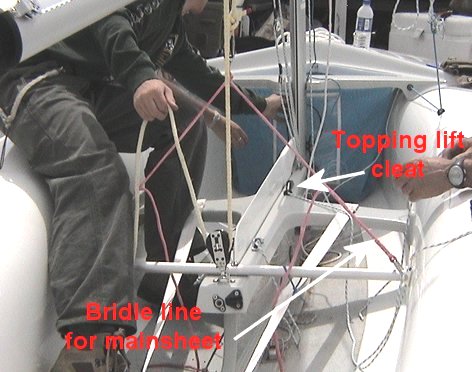
 Next,
make sense out of the topping lift; the part below the hook runs
through the hole in the deck in front of the mast, and down through
the eye on the hull that is just to the left of the mast base.From there,
this shock cord gets tied off to to a piece of utility line that ties
to the hiking strap eye strap at the back of the cockpit. The other
end of the topping lift comes down the startboard side of the
mast to the block on the mast base that is mounted farthest
from the mast, then up underneath the board box cap to the front cleat
on the starboard side of the boardbox. Next,
make sense out of the topping lift; the part below the hook runs
through the hole in the deck in front of the mast, and down through
the eye on the hull that is just to the left of the mast base.From there,
this shock cord gets tied off to to a piece of utility line that ties
to the hiking strap eye strap at the back of the cockpit. The other
end of the topping lift comes down the startboard side of the
mast to the block on the mast base that is mounted farthest
from the mast, then up underneath the board box cap to the front cleat
on the starboard side of the boardbox.
The spinnaker halyard is next; look up the mast, and take the
end that comes over the top of the block and tie it off somewhere convenient
- a good rigging habit to get into, is to tie this to the hook (called
a twing or pole guy hook) on the PORT edge of the boat that is just
in front of the stay plates - this is the end that will eventually get
tied to the head of the spinnaker, and it gets tied so that the halyard
pulls the spinnaker out of the bag on the PORT side of the jib. The
end of the halyard that comes down the mast goes through to block on
the lower port side of the mast base, then along underneath the boardbox
cap and comes out the small hole on the back end of the boardbox, where
there is also a cleat for it.
Finally the jib halyard; the rope tail that is tied to the halyard
block comes down the starboard side of the mast, all the way to the
block on the bottom that is closest to the mast. Don't tie any knots
in this line - as the jib is raised, the end of the line first goes
through that block that is on the end of the wire part of the halyard,
then back down to the standard cleat on the starboard side of the mast
that is opposite of the cleat that the main halyard uses. This is the
line that controls mast rake and takes all of the load so its important
that it works well. There is one other small line, about 4 ft long,
it gets tied to he loop on the mast that is just below the gooseneck,
and is the cunningham, it goes through the cunningham eye on the mainsail
and to the cleat on the other side of the mast from the eye it is tied
to.
Bridle and Mainsheet
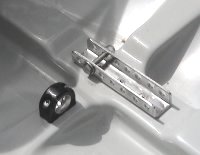
Almost out of lines to worry about; next is the bridle. This
is a small, 9-ft line that needs a loop tied in the middle, then the
ends go through the large shackles on either end of the bar that runs
across the cockpit at the back end of the board box. The mainsheet block
that you thought went on the eye strap just in front of the ratchet
block gets attached to the loop. If you are lucky, this line has 'slip
loops' already spliced on the ends, if not, you will have to be creative
with knots on either end that you can easily adjust. The idea here is
that the height of this mainsheet block can be adjusted for different
winds, higher for light wind and lower for stronger wind, so that the
boom can stay closer to the centerline. The two photos left and below
show the block with becket attached to the center of the bridle, and
the complete assembly with its slip splices.
Notice on left photo, no shackle is used, to help keep it lighter.
And below, everything to make a bridle, a marking pen and a knife with
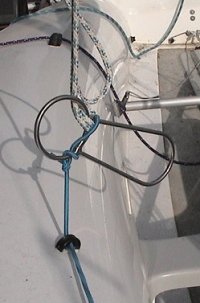
a splicing fid. 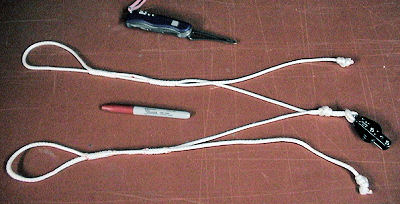 Look
carefully and you will see double splices, this holds much better than
a single splice. The big loops are where the line gets attached to the
big shacles on the ends of the mainsheet tube. Look
carefully and you will see double splices, this holds much better than
a single splice. The big loops are where the line gets attached to the
big shacles on the ends of the mainsheet tube.
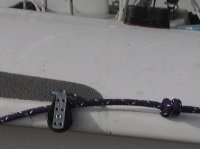
Here is a photo of the bridle/mainsheet system on the boat. Look closely
for the 'slip splices' in both ends of the bridle - you can see the
ends hanging down out of the splices.  This
works only with a modern hi-tech line such as Amsteel 12, or what I
use, Endura 12. The tail of the line is spliced about 4" into the
body of the line; when there is no load, its easy to adjust the line
length, and when its under load, the splices don't slip at all. This
works only with a modern hi-tech line such as Amsteel 12, or what I
use, Endura 12. The tail of the line is spliced about 4" into the
body of the line; when there is no load, its easy to adjust the line
length, and when its under load, the splices don't slip at all.
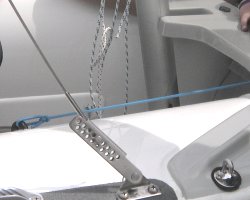
Now, attach the boom to the mast, and run the outhaul line from
the cleat on the boom to the block on the end of the boom, and just
put in a convenient knot that can be undone fast. It goes up through
the clew eye on the mainsail, then tied to the eye on the opposite side
of the boom end from the block. Then the mainsheet, it attaches
first to the block on the bridle, then up to the forward boom block,
then back around the block it started at, back up around to the aft
boom block, and finally down to the ratchet block (see photo here).
Spinnaker and Jib Sheets
 Next
is the spinnaker sheet, its a one-piece continuous line. Start
by tieing one end to the forestay, then take the other end and go around
the outside of the boat to the sheet block that is on the rail of the
boat just in front of where the helmsman sits. Pull all of the slack
line through the block, and tie a figure-8 in it 12' from the end that
is tied to the forestay; make sure the fig-8 knot is on the BACK side
of the block, not on the spinnaker side!. When this knot is in the right
place, it will prevent the end of the spinnaker pole from hitting the
forestay if it is accidentally released. (Check this knot position after
everything is set up by hoisting the spinnaker and pushing the pole
forward, and retie as necessary to keep the pole off the forestay.)
Then run all of the line across the boat, in FRONT of all of the mainsheet
system, and thru the block on the other side, and up to the forestay.
Mark or hold where it enters that block, pull the end back through,
and put in a figure-8 here on this side, same as the other side, 12'
from the end of the line - and remember to check the knot position on
this side. These figure-8s may need to be adjusted after time, when
the lines have stretched out a bit, if the pole can hit the forestay. Next
is the spinnaker sheet, its a one-piece continuous line. Start
by tieing one end to the forestay, then take the other end and go around
the outside of the boat to the sheet block that is on the rail of the
boat just in front of where the helmsman sits. Pull all of the slack
line through the block, and tie a figure-8 in it 12' from the end that
is tied to the forestay; make sure the fig-8 knot is on the BACK side
of the block, not on the spinnaker side!. When this knot is in the right
place, it will prevent the end of the spinnaker pole from hitting the
forestay if it is accidentally released. (Check this knot position after
everything is set up by hoisting the spinnaker and pushing the pole
forward, and retie as necessary to keep the pole off the forestay.)
Then run all of the line across the boat, in FRONT of all of the mainsheet
system, and thru the block on the other side, and up to the forestay.
Mark or hold where it enters that block, pull the end back through,
and put in a figure-8 here on this side, same as the other side, 12'
from the end of the line - and remember to check the knot position on
this side. These figure-8s may need to be adjusted after time, when
the lines have stretched out a bit, if the pole can hit the forestay.
The jib sheet is another one-piece line, The center of it is normally
tied to the clew of the jib and left there. When the boat is rigged
for sailing, the ends of the sheet goe through the pad eyes on the deck
across the cleats, and figure-8s are tied int he ends.
(Neat rigging trick ~ I set up my custom jib sheets with a small piece
of Endura 12, a high-tech line, spliced through the center of the line
with about 10" of it hanging out. This small line ties to the clew
instead of a big knot in the sheet itself. With this system, there are
no big, bulky knots to hang up on the mast when you tack and jibe.)
 Trapeze
Wires Trapeze
Wires
Tie the trapeze adjuster line to the bottom of the cleat on the trapeze
wires, then run it through the middle bar of the trapeze loop or ring
(called a dogbone) then run the line back up and through the cleat,
finishing off with a fingure-8. The small loop that you left in the
trapeze shockcord a long time ago then comes up through the dogbone,
and take the loop end back over the bottom of the bone to secure it.
Do the same on the other side. Notice that I run everything around the
middle of the dogbone; the small ring is now a 'high' trapeze position
for waves or with spinnaker, and the long side of the 'bone is the 'low'
position for normal upwind sailing. This quickly gives the two positions
needed without having to adjust the line throught the cleat.
Mast Rake
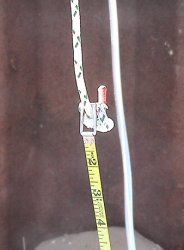 This
is the beginning point of all tuning in this boat. Get out your tuning
guide and memorize the mast rake measurement for light winds (21' 6
1/2"), this is your set-up and starting point. Mast rake is measured
by tieing a tape measure to the main halyard, and pulling the main halyard
up the mast all the way. Then pull the tape to take the slack out of
it, over the middle of the transom of the boat and down to the the bottom
of the hull, and read the tape measure at the center of the bottom of
the hull.. This
is the beginning point of all tuning in this boat. Get out your tuning
guide and memorize the mast rake measurement for light winds (21' 6
1/2"), this is your set-up and starting point. Mast rake is measured
by tieing a tape measure to the main halyard, and pulling the main halyard
up the mast all the way. Then pull the tape to take the slack out of
it, over the middle of the transom of the boat and down to the the bottom
of the hull, and read the tape measure at the center of the bottom of
the hull.. 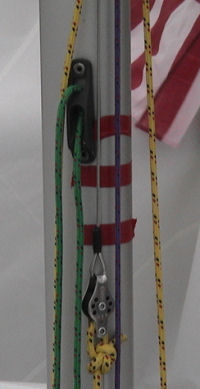 Adjust
the jib halyard to get to the correct number - it helps a lot
to have someone pushing back on the mast so the forestay is tight. Then
put a mark on the mast at the top of the block that is on the end of
the wire part of the jib halyard. Now ease off the jib halyard, and
slowly tighten up the side stay adjusters, and retighten the jib halyard,
to check on the stay tension (use a Loos Guage, or simply twang the
wires, you should get a nice low note, not a wabble-wabble of the rig
- and yes, to get to this point, the jib halyard gets pulled really
tight). As the rig gets tight, you will probably see the rake measurement
change, just put another new mark on the mast at the correct jib halyard
position. In the photo right, the current setting, with the wire swedge
on the bottom band, is for light wind (mast farther foreward). The middle
tape is the setting for medium wind, and the top tape for heavy air. Adjust
the jib halyard to get to the correct number - it helps a lot
to have someone pushing back on the mast so the forestay is tight. Then
put a mark on the mast at the top of the block that is on the end of
the wire part of the jib halyard. Now ease off the jib halyard, and
slowly tighten up the side stay adjusters, and retighten the jib halyard,
to check on the stay tension (use a Loos Guage, or simply twang the
wires, you should get a nice low note, not a wabble-wabble of the rig
- and yes, to get to this point, the jib halyard gets pulled really
tight). As the rig gets tight, you will probably see the rake measurement
change, just put another new mark on the mast at the correct jib halyard
position. In the photo right, the current setting, with the wire swedge
on the bottom band, is for light wind (mast farther foreward). The middle
tape is the setting for medium wind, and the top tape for heavy air.
Once you have a nice, tight rig with the rake set for light winds,
you can mark the side stay adjusters so you remember the position (or
better yet, write down the pin position in the new notebook that you
have for your C420 sailing), and then tape the pins and rings. Then
use your tuning guide and measure the mast rake for medium (21' 2")
and strong (20' 9 1/2") winds, and make the marks on the mast at
the top of the jib halyard block for those settings, so you can instantly
set up your boat for different conditions without have to measure anything.
Hint; make sure the forestay is tight when you measure the rake, by
either pushing back on the mast or pulling hard on the side stays.
As you rake the mast further back for medium and strong winds, the
side stays will get some slack. Take this slack out by tightening the
side stay adjusters. Second Hint; let the forestay off just a bit so
you can get the adjuster pins in a bit lower, then make sure you can
pull the rig back to the correct mast rake. Experienced - and highly
skilled - crews may want to set the rig much tighter in stronger winds.
This is a SKILL adjustment, it will not make the boat 'faster' if the
sailors don't have the knowledge and strong-wind skills to handle it.
My rigging numbers for mast rake come from North Sails, and like most
magic numbers, should be considered as guides, not as firm rules. Mast
rake should be rechecked during the season - and especially at big events.
Lines, even the steel stay wires, change with time and load, and its
normal for the measurments to change. For this reason, on new boats
especially, use tape on the mast and mark the tape with the rake settings
instead of putting marks on the mast that may change with time.
Spinnaker
The head of the spinnaker gets tied to that line that you tied to the
hook on the port rail a long time ago, and the other ends get tied to
the sheet lines (hint; don't tie the sheets to the sail, take the line
through the eyes in the sail and use figure-8 knots, its less bulky),
and then the spinnaker gets stuffed into the spinnaker bag, just make
sure you do it so that the halyard to the spinnaker head comes down
on the port side of the forestay and BOTH sheet lines come out of the
same side, with one of the sheet lines going around the front of the
forestay. When the spinnaker is in the bag, take the slack out of the
spinnaker sheet, and ease the spinnaker halyard so that you can hook
the halyard back under that same hook on the port side that you had
it tied to - the halyard stays there for normal sailing, part of the
crew's job before hoisting the spinnaker is to get the halyard out of
the hook, and after the spinnaker is down, the halyard should be pulled
back under the hook again. This keeps it from flopping around and possibly
twisting around the stays, which makes it really ugly when its time
to get the spinnaker back up.
The dreaded Boom Vang
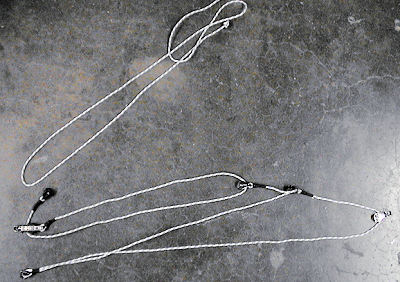 This
is easy to leave to last. These cascading vangs can get messed up, so
we don't want to have it in the way while rigging. The simple end, with
no lines dangling (far right side of the photo), is the end that goes
on the boom. The other ends (lower left side in the photo) get attached
to the steel loop (called a bale) on the bottom of the mast. That should
leave a line hanging lose with a block on the end of it laying on bottom
of the boat. On the aft, port side of the board box is one final cleat
with a line in it - fish around with your hand under the board box top
and you should find that line is a loop, one end coming up throught
the cleat, and the other end coming back up throught a hole aft of the
cleat in the board box cap to a fingure-8 knot. Untie the 8, pull the
end back down, run it through the block on the end of the vang, and
bring it back to to the hole, run it up through and retie the figure-8.
The vang may have to be adjusted to work correctly, you will only know
after sailing. The only line to adjust is the end of the vang that ties
to that last block, don't try to play with the cascade system. This
is easy to leave to last. These cascading vangs can get messed up, so
we don't want to have it in the way while rigging. The simple end, with
no lines dangling (far right side of the photo), is the end that goes
on the boom. The other ends (lower left side in the photo) get attached
to the steel loop (called a bale) on the bottom of the mast. That should
leave a line hanging lose with a block on the end of it laying on bottom
of the boat. On the aft, port side of the board box is one final cleat
with a line in it - fish around with your hand under the board box top
and you should find that line is a loop, one end coming up throught
the cleat, and the other end coming back up throught a hole aft of the
cleat in the board box cap to a fingure-8 knot. Untie the 8, pull the
end back down, run it through the block on the end of the vang, and
bring it back to to the hole, run it up through and retie the figure-8.
The vang may have to be adjusted to work correctly, you will only know
after sailing. The only line to adjust is the end of the vang that ties
to that last block, don't try to play with the cascade system.
Hot tips and other rigging things to know;
- Make sure the rudder pull-down line is correct, over the top of
the last pin on the front of the rudder head, so it can be cleated
tightly to hold the rudder down. Check the spring clip on the back
of the boat often, to be sure it is working or you may lose the rudder
in a capsize. For safety, tie a short line from the top of the rudder
to the hiking strap eye inside the boat.
- Better lines make the boat sail better. My favorites; a high-tech
bridle made of Spectra, Technora, Dyneema, Endura, etc, 1/8 inch,
with slip splices.
- Second line trick is a light-weight spinnnaker sheet that floats,
that means it has some polypropylene in it.
- Third trick is a higher-tech main halyard, so the line doesn't stretch
in stronger winds. We want the sail cunningham to work, which means
that a good to great main halyard is necessary. Go with a medium-high
tech line with a core that does not stretch but a polyester cover,
so its still easy to tie.
- Same trick with the jib halyard, use a high-tech line with a no-stretch
core, and go down a size from the standard so it fits on the side
of the mast at the deck easier.
- Line colors; I hate the boats that have all the same color lines
close together ("Hey, crew, I said pull on THIS yellow line,
not that one!"). Not only should you have different color lines
for similar jobs, but in a team or group, the boats should all use
the same color-code to make it easier to coach, and to switch boats
for speed testing and tuning.
- Remember the class requires an 8-meter long, 8mm diameter painter,
use only polypropylene since it will not absorb water.
I used to have a full rig kit of lines - but everybody has personal
preferences! If you want at least 3 "main" lines (sheets and/or
halyards) contact us for options and pricing. Below are some recommendations.
- Mainseet ~ 8 mm Bzzz line yellow (Great on the hands)
- Jibsheet ~ 7 mm Bzzz line green(and Bzzz works really well in cleats)
- Spinnaker sheet ~ lots of 5mm and 6mm options, from 3/16" Sta-Set
to 6 mm Euro Endura with tapered ends
- Main halyard ~ 4.8mm Spyder Line black (zero stretch, so the luff
stretches when you pull on the cunningham, not the halyard)
- Jib Halyard ~ 3.8 mm Spyder Line purple. (again, zero stretch, so
that the rake stays where you set it, regardless of wind)
- Class-legal painter, Marlow Marstron 8 mm yellow, and the magical
bridle, 3 mm Endura 12 in red.
Check out my Gear pages on this web site for a complete list of lines
and other goodies. Pricing is dirt-cheap - and even cheaper for teams/groups/clubs
that have worked with me. If you don't see something you need or want,
contact me to let me know what you need.
|